不知不覺中,帶你一步步深入了解View系列的文章已經(jīng)寫到第四篇了,回顧一下,我們一共學(xué)習(xí)了LayoutInflater的原理分析、視圖的繪制流程、視圖的狀態(tài)及重繪等知識(shí),算是把View中很多重要的知識(shí)點(diǎn)都涉及到了。如果你還沒有看過我前面的幾篇文章,建議先去閱讀一下,多了解一些原理方面的東西。
之前我有承諾過,會(huì)在View這個(gè)話題上多寫幾篇博客,講一講View的工作原理,以及自定義View的方法。現(xiàn)在前半部分的承諾已經(jīng)如約兌現(xiàn)了,那么今天我就要來兌現(xiàn)后面部分的承諾,講一講自定義View的實(shí)現(xiàn)方法,同時(shí)這也是帶你一步步深入了解View系列的完結(jié)篇。
一些接觸Android不久的朋友對(duì)自定義View都有一絲畏懼感,總感覺這是一個(gè)比較高級(jí)的技術(shù),但其實(shí)自定義View并不復(fù)雜,有時(shí)候只需要簡(jiǎn)單幾行代碼就可以完成了。
如果說要按類型來劃分的話,自定義View的實(shí)現(xiàn)方式大概可以分為三種,自繪控件、組合控件、以及繼承控件。那么下面我們就來依次學(xué)習(xí)一下,每種方式分別是如何自定義View的。
自繪控件的意思就是,這個(gè)View上所展現(xiàn)的內(nèi)容全部都是我們自己繪制出來的。繪制的代碼是寫在onDraw()方法中的,而這部分內(nèi)容我們已經(jīng)在 Android視圖繪制流程完全解析,帶你一步步深入了解View(二) 中學(xué)習(xí)過了。
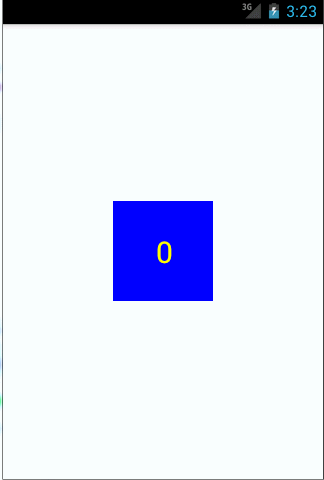
下面我們準(zhǔn)備來自定義一個(gè)計(jì)數(shù)器View,這個(gè)View可以響應(yīng)用戶的點(diǎn)擊事件,并自動(dòng)記錄一共點(diǎn)擊了多少次。新建一個(gè)CounterView繼承自View,代碼如下所示:
public class CounterView extends View implements OnClickListener { PRivate Paint mPaint; private Rect mBounds; private int mCount; public CounterView(Context context, AttributeSet attrs) { super(context, attrs); mPaint = new Paint(Paint.ANTI_ALIAS_FLAG); mBounds = new Rect(); setOnClickListener(this); } @Override protected void onDraw(Canvas canvas) { super.onDraw(canvas); mPaint.setColor(Color.BLUE); canvas.drawRect(0, 0, getWidth(), getHeight(), mPaint); mPaint.setColor(Color.YELLOW); mPaint.setTextSize(30); String text = String.valueOf(mCount); mPaint.getTextBounds(text, 0, text.length(), mBounds); float textWidth = mBounds.width(); float textHeight = mBounds.height(); canvas.drawText(text, getWidth() / 2 - textWidth / 2, getHeight() / 2 + textHeight / 2, mPaint); } @Override public void onClick(View v) { mCount++; invalidate(); }}可以看到,首先我們?cè)贑ounterView的構(gòu)造函數(shù)中初始化了一些數(shù)據(jù),并給這個(gè)View的本身注冊(cè)了點(diǎn)擊事件,這樣當(dāng)CounterView被點(diǎn)擊的時(shí)候,onClick()方法就會(huì)得到調(diào)用。而onClick()方法中的邏輯就更加簡(jiǎn)單了,只是對(duì)mCount這個(gè)計(jì)數(shù)器加1,然后調(diào)用invalidate()方法。通過 Android視圖狀態(tài)及重繪流程分析,帶你一步步深入了解View(三) 這篇文章的學(xué)習(xí)我們都已經(jīng)知道,調(diào)用invalidate()方法會(huì)導(dǎo)致視圖進(jìn)行重繪,因此onDraw()方法在稍后就將會(huì)得到調(diào)用。既然CounterView是一個(gè)自繪視圖,那么最主要的邏輯當(dāng)然就是寫在onDraw()方法里的了,下面我們就來仔細(xì)看一下。這里首先是將Paint畫筆設(shè)置為藍(lán)色,然后調(diào)用Canvas的drawRect()方法繪制了一個(gè)矩形,這個(gè)矩形也就可以當(dāng)作是CounterView的背景圖吧。接著將畫筆設(shè)置為黃色,準(zhǔn)備在背景上面繪制當(dāng)前的計(jì)數(shù),注意這里先是調(diào)用了getTextBounds()方法來獲取到文字的寬度和高度,然后調(diào)用了drawText()方法去進(jìn)行繪制就可以了。
這樣,一個(gè)自定義的View就已經(jīng)完成了,并且目前這個(gè)CounterView是具備自動(dòng)計(jì)數(shù)功能的。那么剩下的問題就是如何讓這個(gè)View在界面上顯示出來了,其實(shí)這也非常簡(jiǎn)單,我們只需要像使用普通的控件一樣來使用CounterView就可以了。比如在布局文件中加入如下代碼:
<RelativeLayout xmlns:android="http://schemas.android.com/apk/res/android" android:layout_width="match_parent" android:layout_height="match_parent" > <com.example.customview.CounterView android:layout_width="100dp" android:layout_height="100dp" android:layout_centerInParent="true" /></RelativeLayout>可以看到,這里我們將CounterView放入了一個(gè)RelativeLayout中,然后可以像使用普通控件來給CounterView指定各種屬性,比如通過layout_width和layout_height來指定CounterView的寬高,通過android:layout_centerInParent來指定它在布局里居中顯示。只不過需要注意,自定義的View在使用的時(shí)候一定要寫出完整的包名,不然系統(tǒng)將無(wú)法找到這個(gè)View。好了,就是這么簡(jiǎn)單,接下來我們可以運(yùn)行一下程序,并不停地點(diǎn)擊CounterView,效果如下圖所示。
怎么樣?是不是感覺自定義View也并不是什么高級(jí)的技術(shù),簡(jiǎn)單幾行代碼就可以實(shí)現(xiàn)了。當(dāng)然了,這個(gè)CounterView功能非常簡(jiǎn)陋,只有一個(gè)計(jì)數(shù)功能,因此只需幾行代碼就足夠了,當(dāng)你需要繪制比較復(fù)雜的View時(shí),還是需要很多技巧的。
二、組合控件
組合控件的意思就是,我們并不需要自己去繪制視圖上顯示的內(nèi)容,而只是用系統(tǒng)原生的控件就好了,但我們可以將幾個(gè)系統(tǒng)原生的控件組合到一起,這樣創(chuàng)建出的控件就被稱為組合控件。
舉個(gè)例子來說,標(biāo)題欄就是個(gè)很常見的組合控件,很多界面的頭部都會(huì)放置一個(gè)標(biāo)題欄,標(biāo)題欄上會(huì)有個(gè)返回按鈕和標(biāo)題,點(diǎn)擊按鈕后就可以返回到上一個(gè)界面。那么下面我們就來嘗試去實(shí)現(xiàn)這樣一個(gè)標(biāo)題欄控件。
新建一個(gè)title.xml布局文件,代碼如下所示:
<?xml version="1.0" encoding="utf-8"?><RelativeLayout xmlns:android="http://schemas.android.com/apk/res/android" android:layout_width="match_parent" android:layout_height="50dp" android:background="#ffcb05" > <Button android:id="@+id/button_left" android:layout_width="60dp" android:layout_height="40dp" android:layout_centerVertical="true" android:layout_marginLeft="5dp" android:background="@drawable/back_button" android:text="Back" android:textColor="#fff" /> <TextView android:id="@+id/title_text" android:layout_width="wrap_content" android:layout_height="wrap_content" android:layout_centerInParent="true" android:text="This is Title" android:textColor="#fff" android:textSize="20sp" /></RelativeLayout>在這個(gè)布局文件中,我們首先定義了一個(gè)RelativeLayout作為背景布局,然后在這個(gè)布局里定義了一個(gè)Button和一個(gè)TextView,Button就是標(biāo)題欄中的返回按鈕,TextView就是標(biāo)題欄中的顯示的文字。
接下來創(chuàng)建一個(gè)TitleView繼承自FrameLayout,代碼如下所示:
public class TitleView extends FrameLayout { private Button leftButton; private TextView titleText; public TitleView(Context context, AttributeSet attrs) { super(context, attrs); LayoutInflater.from(context).inflate(R.layout.title, this); titleText = (TextView) findViewById(R.id.title_text); leftButton = (Button) findViewById(R.id.button_left); leftButton.setOnClickListener(new OnClickListener() { @Override public void onClick(View v) { ((Activity) getContext()).finish(); } }); } public void setTitleText(String text) { titleText.setText(text); } public void setLeftButtonText(String text) { leftButton.setText(text); } public void setLeftButtonListener(OnClickListener l) { leftButton.setOnClickListener(l); }}TitleView中的代碼非常簡(jiǎn)單,在TitleView的構(gòu)建方法中,我們調(diào)用了LayoutInflater的inflate()方法來加載剛剛定義的title.xml布局,這部分內(nèi)容我們已經(jīng)在 Android LayoutInflater原理分析,帶你一步步深入了解View(一) 這篇文章中學(xué)習(xí)過了。接下來調(diào)用findViewById()方法獲取到了返回按鈕的實(shí)例,然后在它的onClick事件中調(diào)用finish()方法來關(guān)閉當(dāng)前的Activity,也就相當(dāng)于實(shí)現(xiàn)返回功能了。
另外,為了讓TitleView有更強(qiáng)地?cái)U(kuò)展性,我們還提供了setTitleText()、setLeftButtonText()、setLeftButtonListener()等方法,分別用于設(shè)置標(biāo)題欄上的文字、返回按鈕上的文字、以及返回按鈕的點(diǎn)擊事件。
到了這里,一個(gè)自定義的標(biāo)題欄就完成了,那么下面又到了如何引用這個(gè)自定義View的部分,其實(shí)方法基本都是相同的,在布局文件中添加如下代碼:
<RelativeLayout xmlns:android="http://schemas.android.com/apk/res/android" xmlns:tools="http://schemas.android.com/tools" android:layout_width="match_parent" android:layout_height="match_parent" > <com.example.customview.TitleView android:id="@+id/title_view" android:layout_width="match_parent" android:layout_height="wrap_content" > </com.example.customview.TitleView></RelativeLayout>這樣就成功將一個(gè)標(biāo)題欄控件引入到布局文件中了,運(yùn)行一下程序,效果如下圖所示:

現(xiàn)在點(diǎn)擊一下Back按鈕,就可以關(guān)閉當(dāng)前的Activity了。如果你想要修改標(biāo)題欄上顯示的內(nèi)容,或者返回按鈕的默認(rèn)事件,只需要在Activity中通過findViewById()方法得到TitleView的實(shí)例,然后調(diào)用setTitleText()、setLeftButtonText()、setLeftButtonListener()等方法進(jìn)行設(shè)置就OK了。
三、繼承控件
繼承控件的意思就是,我們并不需要自己重頭去實(shí)現(xiàn)一個(gè)控件,只需要去繼承一個(gè)現(xiàn)有的控件,然后在這個(gè)控件上增加一些新的功能,就可以形成一個(gè)自定義的控件了。這種自定義控件的特點(diǎn)就是不僅能夠按照我們的需求加入相應(yīng)的功能,還可以保留原生控件的所有功能,比如 Android PowerImageView實(shí)現(xiàn),可以播放動(dòng)畫的強(qiáng)大ImageView 這篇文章中介紹的PowerImageView就是一個(gè)典型的繼承控件。
為了能夠加深大家對(duì)這種自定義View方式的理解,下面我們?cè)賮砭帉懸粋€(gè)新的繼承控件。ListView相信每一個(gè)Android程序員都一定使用過,這次我們準(zhǔn)備對(duì)ListView進(jìn)行擴(kuò)展,加入在ListView上滑動(dòng)就可以顯示出一個(gè)刪除按鈕,點(diǎn)擊按鈕就會(huì)刪除相應(yīng)數(shù)據(jù)的功能。
首先需要準(zhǔn)備一個(gè)刪除按鈕的布局,新建delete_button.xml文件,代碼如下所示:
<?xml version="1.0" encoding="utf-8"?><Button xmlns:android="http://schemas.android.com/apk/res/android" android:id="@+id/delete_button" android:layout_width="wrap_content" android:layout_height="wrap_content" android:background="@drawable/delete_button" ></Button>這個(gè)布局文件很簡(jiǎn)單,只有一個(gè)按鈕而已,并且我們給這個(gè)按鈕指定了一張刪除背景圖。接著創(chuàng)建MyListView繼承自ListView,這就是我們自定義的View了,代碼如下所示:
public class MyListView extends ListView implements OnTouchListener, OnGestureListener { private GestureDetector gestureDetector; private OnDeleteListener listener; private View deleteButton; private ViewGroup itemLayout; private int selectedItem; private boolean isDeleteShown; public MyListView(Context context, AttributeSet attrs) { super(context, attrs); gestureDetector = new GestureDetector(getContext(), this); setOnTouchListener(this); } public void setOnDeleteListener(OnDeleteListener l) { listener = l; } @Override public boolean onTouch(View v, MotionEvent event) { if (isDeleteShown) { itemLayout.removeView(deleteButton); deleteButton = null; isDeleteShown = false; return false; } else { return gestureDetector.onTouchEvent(event); } } @Override public boolean onDown(MotionEvent e) { if (!isDeleteShown) { selectedItem = pointToPosition((int) e.getX(), (int) e.getY()); } return false; } @Override public boolean onFling(MotionEvent e1, MotionEvent e2, float velocityX, float velocityY) { if (!isDeleteShown && Math.abs(velocityX) > Math.abs(velocityY)) { deleteButton = LayoutInflater.from(getContext()).inflate( R.layout.delete_button, null); deleteButton.setOnClickListener(new OnClickListener() { @Override public void onClick(View v) { itemLayout.removeView(deleteButton); deleteButton = null; isDeleteShown = false; listener.onDelete(selectedItem); } }); itemLayout = (ViewGroup) getChildAt(selectedItem - getFirstVisiblePosition()); RelativeLayout.LayoutParams params = new RelativeLayout.LayoutParams( LayoutParams.WRAP_CONTENT, LayoutParams.WRAP_CONTENT); params.addRule(RelativeLayout.ALIGN_PARENT_RIGHT); params.addRule(RelativeLayout.CENTER_VERTICAL); itemLayout.addView(deleteButton, params); isDeleteShown = true; } return false; } @Override public boolean onSingleTapUp(MotionEvent e) { return false; } @Override public void onShowPress(MotionEvent e) { } @Override public boolean onScroll(MotionEvent e1, MotionEvent e2, float distanceX, float distanceY) { return false; } @Override public void onLongPress(MotionEvent e) { } public interface OnDeleteListener { void onDelete(int index); }}由于代碼邏輯比較簡(jiǎn)單,我就沒有加注釋。這里在MyListView的構(gòu)造方法中創(chuàng)建了一個(gè)GestureDetector的實(shí)例用于監(jiān)聽手勢(shì),然后給MyListView注冊(cè)了touch監(jiān)聽事件。然后在onTouch()方法中進(jìn)行判斷,如果刪除按鈕已經(jīng)顯示了,就將它移除掉,如果刪除按鈕沒有顯示,就使用GestureDetector來處理當(dāng)前手勢(shì)。當(dāng)手指按下時(shí),會(huì)調(diào)用OnGestureListener的onDown()方法,在這里通過pointToPosition()方法來判斷出當(dāng)前選中的是ListView的哪一行。當(dāng)手指快速滑動(dòng)時(shí),會(huì)調(diào)用onFling()方法,在這里會(huì)去加載delete_button.xml這個(gè)布局,然后將刪除按鈕添加到當(dāng)前選中的那一行item上。注意,我們還給刪除按鈕添加了一個(gè)點(diǎn)擊事件,當(dāng)點(diǎn)擊了刪除按鈕時(shí)就會(huì)回調(diào)onDeleteListener的onDelete()方法,在回調(diào)方法中應(yīng)該去處理具體的刪除操作。
好了,自定義View的功能到此就完成了,接下來我們需要看一下如何才能使用這個(gè)自定義View。首先需要?jiǎng)?chuàng)建一個(gè)ListView子項(xiàng)的布局文件,新建my_list_view_item.xml,代碼如下所示:
<?xml version="1.0" encoding="utf-8"?><RelativeLayout xmlns:android="http://schemas.android.com/apk/res/android" android:layout_width="match_parent" android:layout_height="match_parent" android:descendantFocusability="blocksDescendants" android:orientation="vertical" > <TextView android:id="@+id/text_view" android:layout_width="wrap_content" android:layout_height="50dp" android:layout_centerVertical="true" android:gravity="left|center_vertical" android:textColor="#000" /></RelativeLayout>然后創(chuàng)建一個(gè)適配器MyAdapter,在這個(gè)適配器中去加載my_list_view_item布局,代碼如下所示:public class MyAdapter extends ArrayAdapter<String> { public MyAdapter(Context context, int textViewResourceId, List<String> objects) { super(context, textViewResourceId, objects); } @Override public View getView(int position, View convertView, ViewGroup parent) { View view; if (convertView == null) { view = LayoutInflater.from(getContext()).inflate(R.layout.my_list_view_item, null); } else { view = convertView; } TextView textView = (TextView) view.findViewById(R.id.text_view); textView.setText(getItem(position)); return view; }}到這里就基本已經(jīng)完工了,下面在程序的主布局文件里面引入MyListView這個(gè)控件,如下所示:<RelativeLayout xmlns:android="http://schemas.android.com/apk/res/android" xmlns:tools="http://schemas.android.com/tools" android:layout_width="match_parent" android:layout_height="match_parent" > <com.example.customview.MyListView android:id="@+id/my_list_view" android:layout_width="match_parent" android:layout_height="wrap_content" > </com.example.customview.MyListView></RelativeLayout>最后在Activity中初始化MyListView中的數(shù)據(jù),并處理了onDelete()方法的刪除邏輯,代碼如下所示:public class MainActivity extends Activity { private MyListView myListView; private MyAdapter adapter; private List<String> contentList = new ArrayList<String>(); @Override protected void onCreate(Bundle savedInstanceState) { super.onCreate(savedInstanceState); requestWindowFeature(Window.FEATURE_NO_TITLE); setContentView(R.layout.activity_main); initList(); myListView = (MyListView) findViewById(R.id.my_list_view); myListView.setOnDeleteListener(new OnDeleteListener() { @Override public void onDelete(int index) { contentList.remove(index); adapter.notifyDataSetChanged(); } }); adapter = new MyAdapter(this, 0, contentList); myListView.setAdapter(adapter); } private void initList() { contentList.add("Content Item 1"); contentList.add("Content Item 2"); contentList.add("Content Item 3"); contentList.add("Content Item 4"); contentList.add("Content Item 5"); contentList.add("Content Item 6"); contentList.add("Content Item 7"); contentList.add("Content Item 8"); contentList.add("Content Item 9"); contentList.add("Content Item 10"); contentList.add("Content Item 11"); contentList.add("Content Item 12"); contentList.add("Content Item 13"); contentList.add("Content Item 14"); contentList.add("Content Item 15"); contentList.add("Content Item 16"); contentList.add("Content Item 17"); contentList.add("Content Item 18"); contentList.add("Content Item 19"); contentList.add("Content Item 20"); }}這樣就把整個(gè)例子的代碼都完成了,現(xiàn)在運(yùn)行一下程序,會(huì)看到MyListView可以像ListView一樣,正常顯示所有的數(shù)據(jù),但是當(dāng)你用手指在MyListView的某一行上快速滑動(dòng)時(shí),就會(huì)有一個(gè)刪除按鈕顯示出來,如下圖所示: 
點(diǎn)擊一下刪除按鈕就可以將第6行的數(shù)據(jù)刪除了。此時(shí)的MyListView不僅保留了ListView原生的所有功能,還增加了一個(gè)滑動(dòng)進(jìn)行刪除的功能,確實(shí)是一個(gè)不折不扣的繼承控件。
到了這里,我們就把自定義View的幾種實(shí)現(xiàn)方法全部講完了,雖然每個(gè)例子都很簡(jiǎn)單,但是萬(wàn)變不離其宗,復(fù)雜的View也是由這些簡(jiǎn)單的原理堆積出來的。經(jīng)過了四篇文章的學(xué)習(xí),相信每個(gè)人對(duì)View的理解都已經(jīng)較為深入了,那么帶你一步步深入了解View系列的文章就到此結(jié)束,感謝大家有耐心看到最后。
新聞熱點(diǎn)


疑難解答
圖片精選
網(wǎng)友關(guān)注